 Free Shipping over $5,000
 15 Years in Business
 18mo No Interest Financing
Installing a sliding gate for a driveway is a practical solution for enhancing safety and convenience. Sliding gates are ideal for properties with limited space, as they do not require the swing area that traditional gates do.
If you’re wondering how to install sliding gates (driveway), this step-by-step guide provides a comprehensive overview of the steps involved in selecting, preparing, and installing a sliding gate, ensuring a smooth and efficient process. By understanding the necessary tools, materials, and techniques, homeowners can successfully install a sliding gate that meets their specific needs and preferences.
What Are the Benefits of Installing Sliding Gates for Your Driveway?
Sliding gates are a practical and stylish upgrade for both residential and commercial properties. They are ideal for properties with limited driveway space or uneven terrain. Unlike swing gates, they move horizontally along a track, eliminating the need for an opening arc. This design allows vehicles to park closer to the gate without interfering with its movement, maximizing the usable driveway area.
While sliding gates may require a higher initial investment due to their specialized components, such as tracks, rollers, and robust mechanisms for smooth operation, this upfront cost is justified by their exceptional durability and reliability. The materials and engineering involved in their construction are designed to withstand heavy use and various weather conditions, ensuring long-term performance.
What Tools and Materials Are Needed?
To successfully install a sliding gate for a driveway, it is essential to gather the appropriate tools and materials. This preparation ensures a smooth installation process and contributes to the longevity and functionality of the gate system.
Tools
- Measuring Tape: Accurate measurements are crucial for ensuring the gate fits the designated space and operates correctly.
- Level: A level is used to ensure that the track and gate are installed evenly, preventing operational issues.
- Drill and Drill Bits: These are necessary for creating holes in the ground or mounting surfaces to secure the track and other components.
- Wrench Set: Wrenches are used to tighten bolts and nuts, securing various parts of the gate system.
- Screwdriver Set: Different types of screwdrivers may be needed to assemble components and secure electrical connections.
- Hammer: A hammer may be required for minor adjustments and securing certain components.
- Saw: Depending on the material of the gate or track, a saw may be needed to make precise cuts.
Materials
- Sliding Gate Kit: This typically includes the gate itself, track, rollers, and mounting hardware. It is important to select a kit that matches the same width, gate size, and weight requirements of the driveway.
- Concrete Mix: Used to create a stable foundation for the track, ensuring it remains level and secure over time.
- Bolts and Screws: These are used to secure the track and other components to the ground and surrounding structures.
- Lubricant: Essential for maintaining the smooth operation of the gate, reducing friction and wear on moving parts.
- Electrical Wiring and Connectors: Necessary for connecting the motor and any additional electrical components, such as sensors or lights.
- Safety Equipment: Includes gloves, goggles, and other protective gear to ensure safety during the installation process.
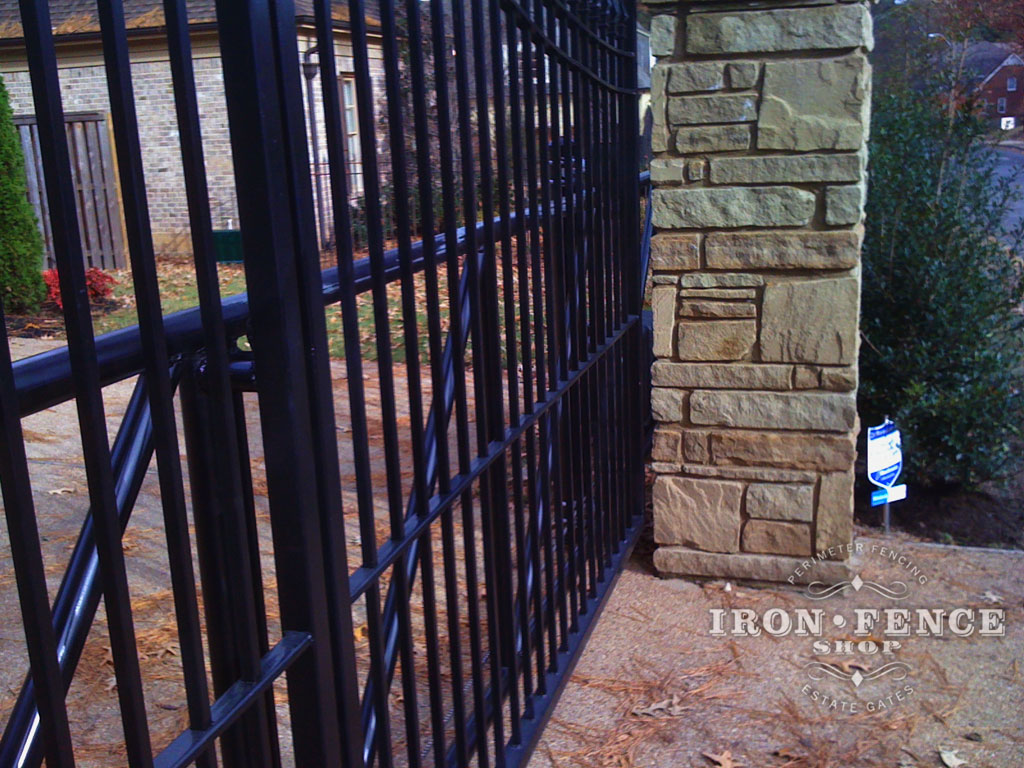
Strength Meets Style: When choosing material for your driveway gate, consider options that balance durability, functionality, and aesthetics. Aluminum gates offer lightweight construction with exceptional corrosion resistance for all-weather durability, while wrought iron gates provide unmatched strength, timeless rigidity, and superior impact resistance for long-lasting performance.
How Do You Install the Gate Track?

To install the gate track for a sliding driveway gate, it is essential to follow a series of precise steps to ensure proper alignment and functionality. The installation of the gate track is a critical component of the overall gate system, as it provides the foundation upon which the gate operates. The following steps outline the process for installing the gate track:
1. Site Preparation
Begin by clearing the installation area of any debris, vegetation, or obstacles that may interfere with the track placement. The ground should be level and compacted to provide a stable base for the track. If the surface is uneven, it may be necessary to pour a concrete foundation to create a level surface. Ensure there is sufficient space for the gate to slide freely.
2. Measurement and Marking
Accurately measure the length of the track required for the gate. The track should extend beyond the entire width of the gate to accommodate the closed position and its movement. Use a chalk line or spray paint to mark the path where the track will be installed, ensuring it is straight and aligned with the intended direction of the gate.
3. Track Installation
Position the track along the marked path. If using a concrete foundation, drill holes into the concrete at regular intervals to secure the track with anchor bolts. For installations on other surfaces, use appropriate fasteners to secure the track. It is crucial to ensure that the track is level throughout its length to prevent operational issues with the gate.
4. Alignment Check
Once the track is secured, perform an alignment check to verify that it is straight and level. Use a spirit level to confirm the track’s horizontal alignment. Any deviations should be corrected by adjusting the track or its supports.
5. Track Testing
Before proceeding with the installation of the gate, test the track by rolling a small section of the gate or a similar object along the track. This test will help identify any irregularities or obstructions that may impede the gate’s movement. Make necessary adjustments to ensure smooth operation.
6. Final Adjustments
After confirming the track’s alignment and functionality, make any final adjustments to the track’s position or fasteners. Ensure that all components are securely tightened and that the track is free of debris or obstructions.
How Do You Mount the Gate?

Mounting a sliding gate involves several precise steps to ensure proper alignment and functionality. The process begins with positioning the gate on the previously installed track. It is crucial to ensure that the gate is aligned correctly with the track to prevent derailment and ensure smooth operation.
The following steps outline the procedure for mounting a sliding gate:
1. Position the Gate
Carefully lift the gate and place it onto the track. It is advisable to have multiple people assist with this step to ensure the gate is positioned accurately and safely.
2. Align the Gate
Once the gate is on the track, check its alignment. The gate should be parallel to the track and evenly spaced from the ground. Use a spirit level to verify that the gate is level across its entire length.
3. Secure the Gate
Attach the gate to the track using the appropriate hardware, such as rollers or wheels, which are typically included in the gate kit. Ensure all fasteners are tightened securely to prevent movement or wobbling during operation.
4. Adjust the Rollers
Adjust the rollers or wheels to ensure they are making full contact with the track. This adjustment is critical for the gate’s stability and smooth sliding motion. The rollers should be checked for proper tension and alignment.
5. Install End Stops
Install end stops at both ends of the track to prevent the gate from sliding off the track. These stops are essential for safety and to protect the gate from damage.
6. Test the Gate
Manually slide the gate back and forth along the track to test its movement. The gate should move smoothly without any resistance or obstruction. If any issues are detected, recheck the alignment and roller adjustments.
7. Fine-Tune Adjustments
Make any necessary fine-tuning adjustments to the gate’s position, rollers, or track to ensure optimal performance. This may involve slight modifications to the roller tension or repositioning the gate slightly for better alignment.
Key Insight: Proper mounting of the sliding gate is essential to prevent operational issues and to maintain the safety of the driveway entrance. A secure installation ensures smooth functionality, long-term durability, and protection against unauthorized access or accidents.
How Do You Install the Motor and Electrical Components?
To install a sliding gate opener motor, start by selecting one that is compatible with your gate’s weight and usage. Mount it securely on a stable, level surface near the gate track.
Attach the motor to the gate using a gear rack or chain, ensuring proper alignment for smooth movement. Adjust as needed to avoid obstructions.
For wiring, turn off the power supply, use appropriate insulated cables, and protect them with weatherproof conduits. Follow safety standards throughout the process.
Program the motor to set opening/closing limits, speed, and force. Refer to the manual for precise instructions, and incorporate safety features like sensors and emergency stops.
Test the gate multiple times to ensure smooth operation and functional safety features. Make adjustments if needed and schedule regular maintenance checks.
How Do You Convert a Swing Gate into a Sliding Gate?
Converting a swing gate into a sliding gate is a practical modification that enhances space efficiency and functionality. This transformation requires careful planning and the installation of specific components, as outlined below:
1. Assessment and Planning
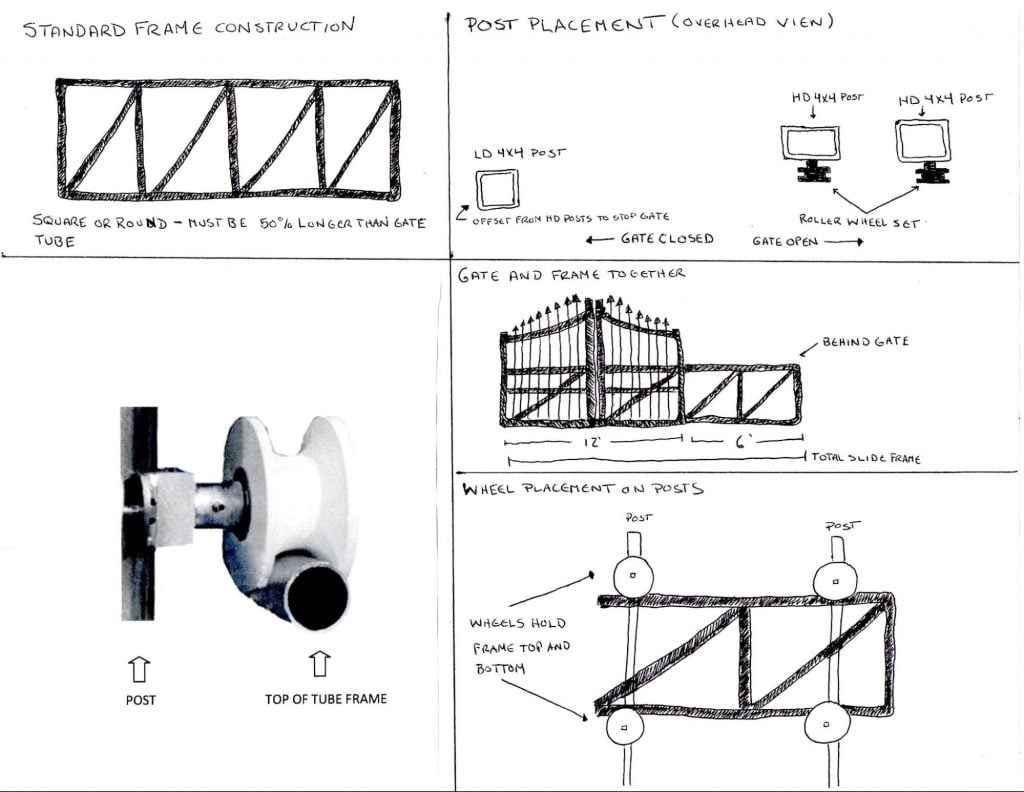
Begin by evaluating the structure and condition of the existing swing gate. Determine if it is suitable for conversion and check whether there is sufficient lateral space for the gate to slide open and closed. Sliding gates require a guiding frame that is at least 50% longer than the gate’s width, as shown in the diagram.
2. Gate Frame Adjustment
Replace or reinforce the swing gate frame, if needed, to ensure a stable structure suitable for sliding. A standard sliding gate frame should use square or round tubing and include diagonal reinforcements. This enhances the gate’s durability and balance during sliding motion.
3. Post Installation and Placement
For a sliding gate, you must have heavy-duty posts to support the gate’s rollers at both ends of the gate’s path. Ensure that these posts are properly secured in the ground and aligned. The overhead view in the “Post Placement” diagram highlights proper placement of the posts and roller assemblies.
4. Wheel and Roller Attachment
Attach rollers or wheels to the top and bottom of the gate frame, as shown in the “Wheel Placement on Post” section of the diagram. The rollers hold the gate securely while allowing smooth horizontal movement along the guideposts. Use suitable bolts and fasteners to ensure the rollers are firmly attached to both the gate and the posts. Check that the rollers align properly with the guideposts to prevent wobbling.
5. Sliding Track Installation (if applicable)
Depending on the design, a sliding track may be required along the ground to guide the wheels for smoother operation. This track should be properly leveled and secured with anchor bolts. Ensure the gate’s wheels rest evenly on the track to allow unobstructed movement.
6. Testing and Adjustments
Test the gate thoroughly by opening and closing it several times. Verify that the movement is smooth and that the gate aligns properly along its entire path. Make adjustments to the rollers, stoppers, or motor, if necessary, to achieve optimal performance and safety.
What Regular Maintenance Is Required?
Regular maintenance ensures sliding gates perform optimally and last longer. Key maintenance tasks include:
- Lubrication: Lubricate rollers, hinges, and moving parts every few months to prevent friction and rust. Use a high-quality lubricant as recommended by the manufacturer.
- Inspect for Wear: Check for structural damage like dents or misalignment, and assess rollers and bearings for wear. Replace damaged or deteriorating components immediately.
- Clean Tracks: Clear dirt, leaves, and debris from the track regularly to ensure smooth operation. Address rust or corrosion as soon as it appears.
- Motor & Wiring Check: Inspect the motor and electrical system to ensure all components are functioning. Seek a technician to address wiring damage or motor issues.
- Operational Tests: Open and close the gate several times to check for resistance or unusual noises. Resolve any issues promptly to avoid further complications.
Consistent upkeep not only maximizes the efficiency and reliability of your gate but also minimizes the risk of unexpected failures or costly repairs. Regular maintenance extends the gate’s lifespan, ensuring it continues to function smoothly and securely for years to come.
Mastering Sliding Gate Installation
Installing a sliding gate for a driveway involves careful planning and precise measurement. The process includes preparing the installation area, setting up the gate track, mounting the gate, and installing the motor and electrical components.
Regular maintenance is essential to ensure the gate’s longevity and functionality. By following these steps, homeowners can enhance their property’s safety and convenience.
Now that you know how to install a sliding gate for your driveway, it’s time to choose the perfect one. Explore our exclusive driveway gate styles at Iron Fence Shop, where each gate is crafted with authentic detailing and superior rust inhibition.
Don’t wait—enhance your home’s curb appeal today with our expertly manufactured gates.
Our knowledgeable team is here to guide you every step of the way, ensuring you get exactly what you need. Contact us now and take the first step towards a stunning, secure driveway!